Using your 3CX Android App
Introduction
The 3CX app for Android allows you to seamlessly take your business communications and contacts with you wherever you go. Access the company phonebook, manage calls, answer chats and respond to all kinds of messages - from the palm of your hand. There’s no need to use your personal mobile number for business calls anymore.
Step 1: Install the Android app
- Install the Android app from the Google Play Store.
- Open the app, read and accept the license agreement and authorize the permissions the app needs (camera, microphone).
Step 2: Configure your Extension: Scan the QR code

- Open your web client and click on the QR code in the top right corner.
- Open your camera on your Android device and scan the QR code shown on your screen.
- Grant all the necessary permissions in the next screens.
- Make sure to follow the battery optimization instructions for the app to work efficiently.
- Your extension is configured and you’re now “Ready for calls”!
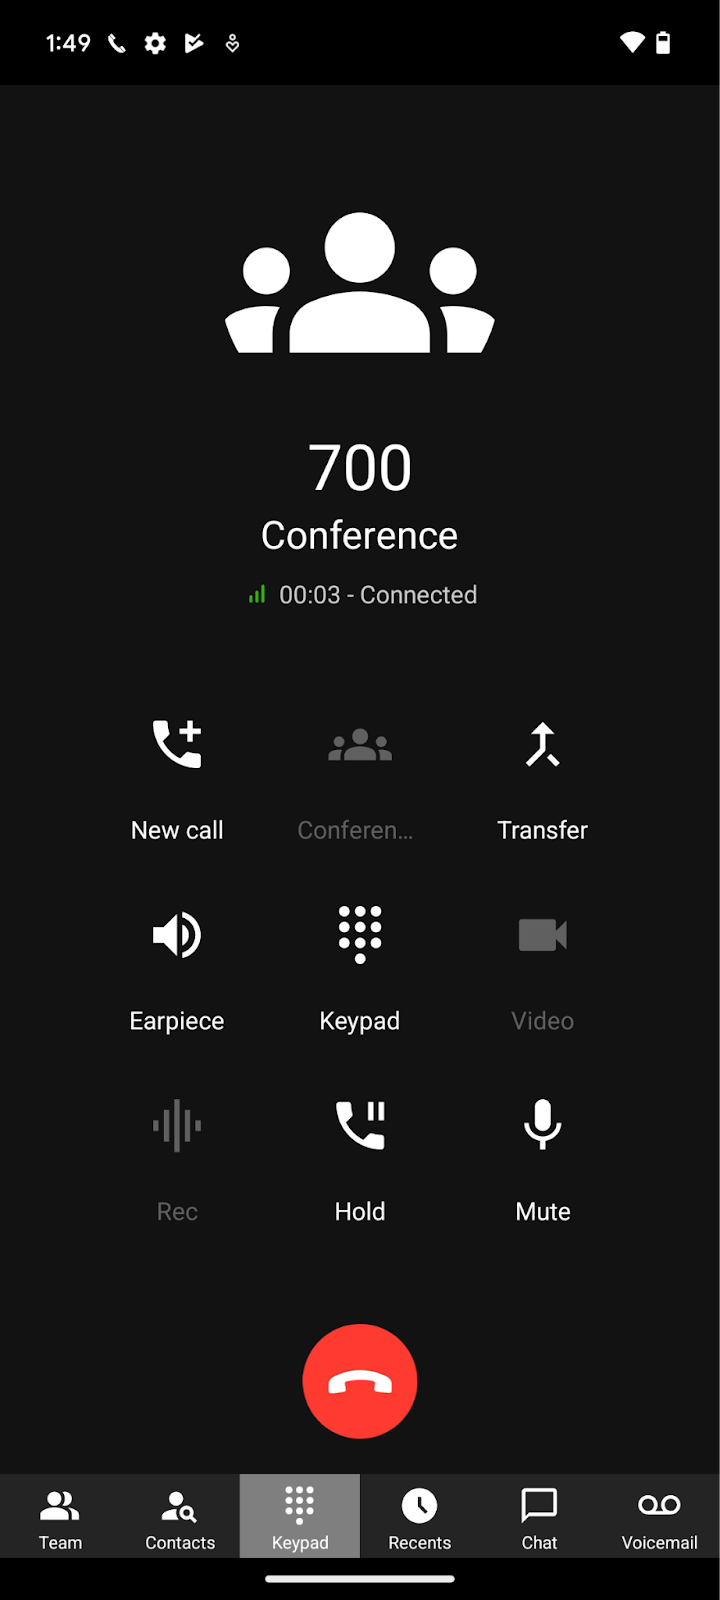
Making a Call
Making a call with the Android app is quick and easy. You can either dial a number in your keypad and hit the call button or search for a contact from your “Contacts”. Search by name, number or email, and then tap on the phone icon next to the contact.
Once you’re in a call, you can seamlessly perform a number of actions, including:
- “Transfer” will give you the option to “Blind” without the need for you to speak to the receiver, or “Attended” will transfer the call after you first speak to the receiver to see if they accept the call and press “Join”.
- “Conference” allows you to create an ad hoc conference call, adding more participants to join the conversation.
- “Rec” allows you to record your conversation.
- “Video” adds video to your call for face to face communication.
Use Google Assistant to Make Calls
Ask Google to make a call using 3CX, be it by name e.g. “OK Google, call James using 3CX” or by number e.g. “OK Google, call 101 using 3CX”. When calling by name, the Google Assistant will try to find a person in your device’s contacts, to pass on to the 3CX App.
- If only one contact is found with one number, the call is initiated immediately.
- If the contact has multiple numbers, the 3CX App will open the contact card for you to choose the number to call.
- In the case of several people with the same name, the 3CX App will filter all contacts by name for you to choose the correct contact.
To set up:
- Enable Google Assistant on your device.
- Ensure both the device and Google assistant region are set to “English (US)”.
- Install the 3CX App with an active account.
Schedule a Video or Audio Conference
Create a video or call conference in seconds with the Android App:
- Tap on the menu button in the top left corner and select “Schedule”.
- Add your Subject then choose a date and time to schedule your conference.
- If you are creating an audio conference you will see a “PIN”
- If you are creating a video conference then you have to enable the “Video” option.
- Choose whether you want to create a calendar event and proceed to “Add 3CX Contacts”. When you’re done adding contacts tap on the arrow in the bottom right hand corner.
- Tap on the arrow in the bottom right hand corner and a new calendar entry will open. Make any necessary changes and click on “Save”.

Note:
- Once the conference is created you cannot alter the participants.
- To join a video conferencing from your Android smartphone you will need to have the 3CX Video Conference App installed.
Create an Ad-hoc Conference
Easily add more participants to an ongoing call:
- Click the “Conference” button on the dialpad.
- Search for who you want to add to the call by name or extension, or enter their phone number.
- Tap to call. They will be automatically dialed and upon answering they will be added to your call.
See our Video Conferencing chapter on how to create a video conference from your smartphone.
Set your Status
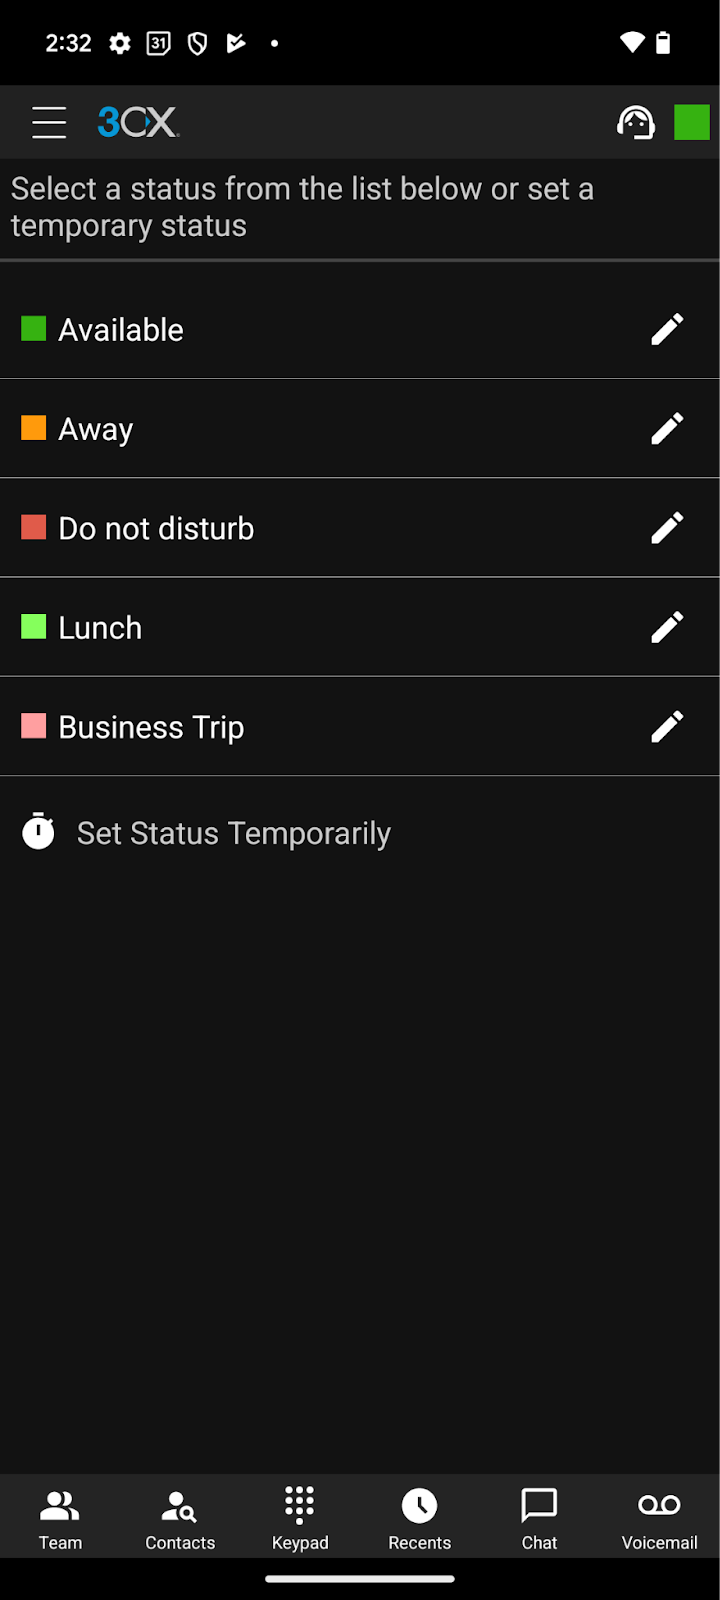
Using the Status feature will let your colleagues know if you’re free to take a call, avoiding distractions and wasted time.
Access the status feature by tapping on the top right hand corner, the green box shown above. Choose from Available, Away, Do Not Disturb, Lunch, Business Trip, and Set Status Temporarily.
You can further customize your status and call forwarding rules by tapping on the pencil icon next to each status.
Personalize your App

Personalize your app by tapping the menu in the top left corner and then “Settings”. Here you will see the following options:
- Accounts: add, edit and switch between accounts
- Advanced: see below
- Choose your app’s theme
- Re-provision and
- Resend Credentials
Related Articles
Using your 3CX iOS App
Introduction Whether you choose to work remotely from home, by the pool or at your neighborhood cafe; the 3CX iOS app lets you take your office extension along for the ride! Apart from call and contact management, you can also chat with colleagues ...3CX Desktop: How to install 3CX desktop app
The 3CX Web Client is easy to use and combines all the features you need to efficiently communicate, collaborate and connect with colleagues, partners, and customers, straight from your browser or from the native Windows and macOS desktop app. From ...3CX Windows Softphone App
Introduction The Windows App is a native softphone for Microsoft Windows. Deployed via the Windows store it offers greater security as all apps are security checked by Microsoft prior to publishing. The softphone enables you to set your status, ...How to Install Multi-Line TAPI
To install the 3CX Multi-Line TAPI for use with your 3CX Desktop App follow the instructions below. Download the installer from here or login to your 3CX Desktop App and go to Settings >> Integration. Run the installer. Specify the extension numbers ...Unite Calling Training & App Files
Unite Calling Introduction Unite Calling is a fully automated Microsoft Teams Direct Routing solution that eliminates high deployment costs, lengthy installation timelines and the need for specialist technical capabilities. Requiring no ...