Configuring WhatsApp
How it works
WhatsApp integration enables your agents to reply to WhatsApp messages directly from 3CX. WhatsApp messages are delivered into the same chat panel as live chat, SMS, and Facebook messages enabling you to reply to multiple channels easily and with the same team.
Step 1: Check the Requirements
- You must have a WhatsApp Business Platform account set up with a phone number added. This number should not be registered to any other existing WhatsApp account, whether it be virtually or on a device. If you want to use a number that is already set up on WhatsApp, you have to delete the account first. Read more here.
- WhatsApp integration is intended to answer inbound messages only. You cannot initiate a conversation with a WhatsApp user. The WhatsApp user must send you a message first. You will then have 24 hours to respond to the message.
Step 2: Create a WhatsApp application
- Navigate to https://developers.facebook.com and click “Log In” on the top right
- Navigate to ‘My Apps’, click on “Create App”, select “Other” and click “Next”.
- Select “Business” for the app type and then click “Next”.
- Give your application a display name and use the drop-down list to select your business account. Click “Create app”.
- Re-enter your password and click “Submit”.
- In the next screen you can add products to your app. Scroll down to WhatsApp and click “Set up”.
- In the “Welcome to the WhatsApp Business Platform” section click “Start Using the API”.

- Use the drop-down menu to choose the correct phone number - the one you will use to send and receive messages. Copy your ‘Phone number ID’ and save it for a later stage.
Step 3: Set up an Admin role

- From the top left-hand side click on the menu icon and select “Business settings”.
- Navigate to “Users” > “System Users” and click “Add”. Accept the non-discrimination policy and click “Done”.
- Set a system user name, i.e. ‘3CX’, and set the user role to “Admin”.

- Click “Add Assets”. In the pop-up box, select “Apps” > “Choose your App” and enable the “Manage app” option. Click “Save Changes”.
- On the left-hand menu navigate to “Accounts” > “WhatsApp accounts”, select your WhatsApp Business account and click “Add people”.

- Select the system user you created, allow full control then click “Assign”.
Step 4: Generate a new token
- From the left-hand menu navigate to “Users” > “System users” and click on “Generate new token”.
- In the pop-up options, select your app from the drop-down list.
- Check the boxes for “whatsapp_business_messaging” and “whatsapp_business_management”. Click “Generate Token”.
- Copy your access token from the pop-up box and save it as it will not be available again. This is a permanent token which does not expire unless you click on the “revoke token” button.
Step 5: Configure 3CX
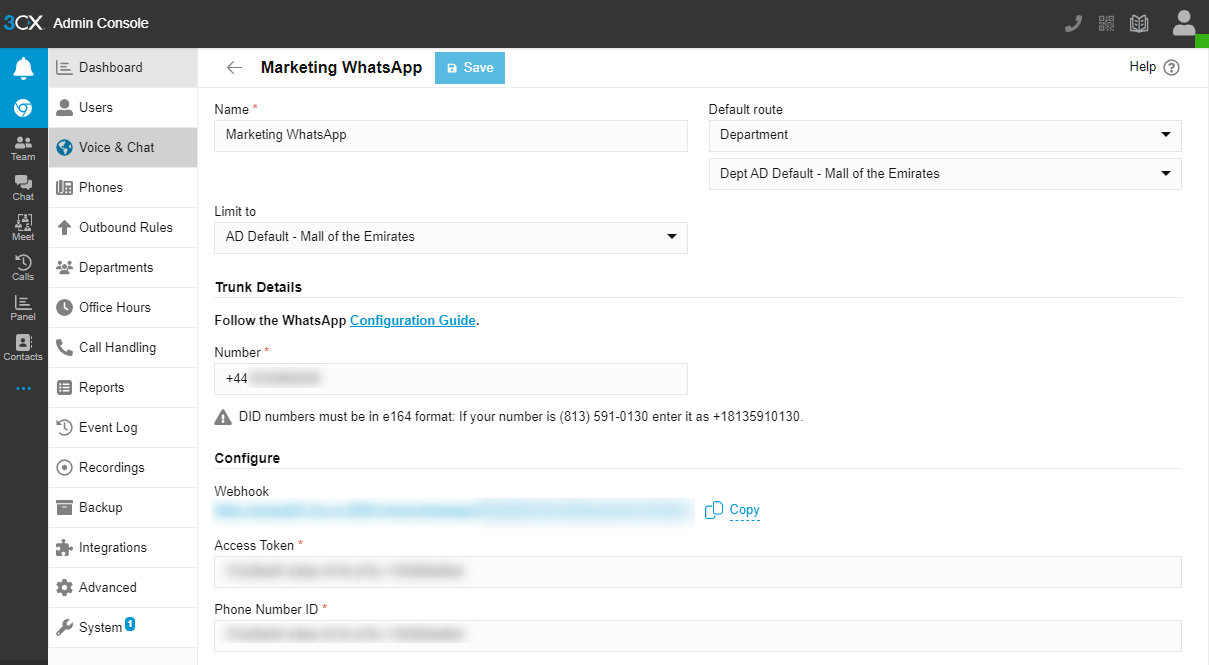
- Log into your Web Client, navigate to “Admin” > “Voice & chat” and then click on “+ Add WhatsApp”.
- Edit the default name to your preferred name.
- Enter your WhatsApp account phone number in an international format (e.g +447732456789).
- Copy the Webhook URL to a notepad.
- Paste the “Access token” obtained in step 3.
- Enter the “Phone number ID” obtained in step 1.
- If you are a ‘System Owner’ or a ‘System Admin’, you can make the integration available system wide or just for the group.
- Click “Save”.
Step 6: Configure your Webhook in WhatsApp
- Login to 3CX Admin console > "Voice & Chat" > “WhatsApp trunk” > "Configure" section and copy the Webhook URL.
- Login to your Meta for Developers portal and locate your app.
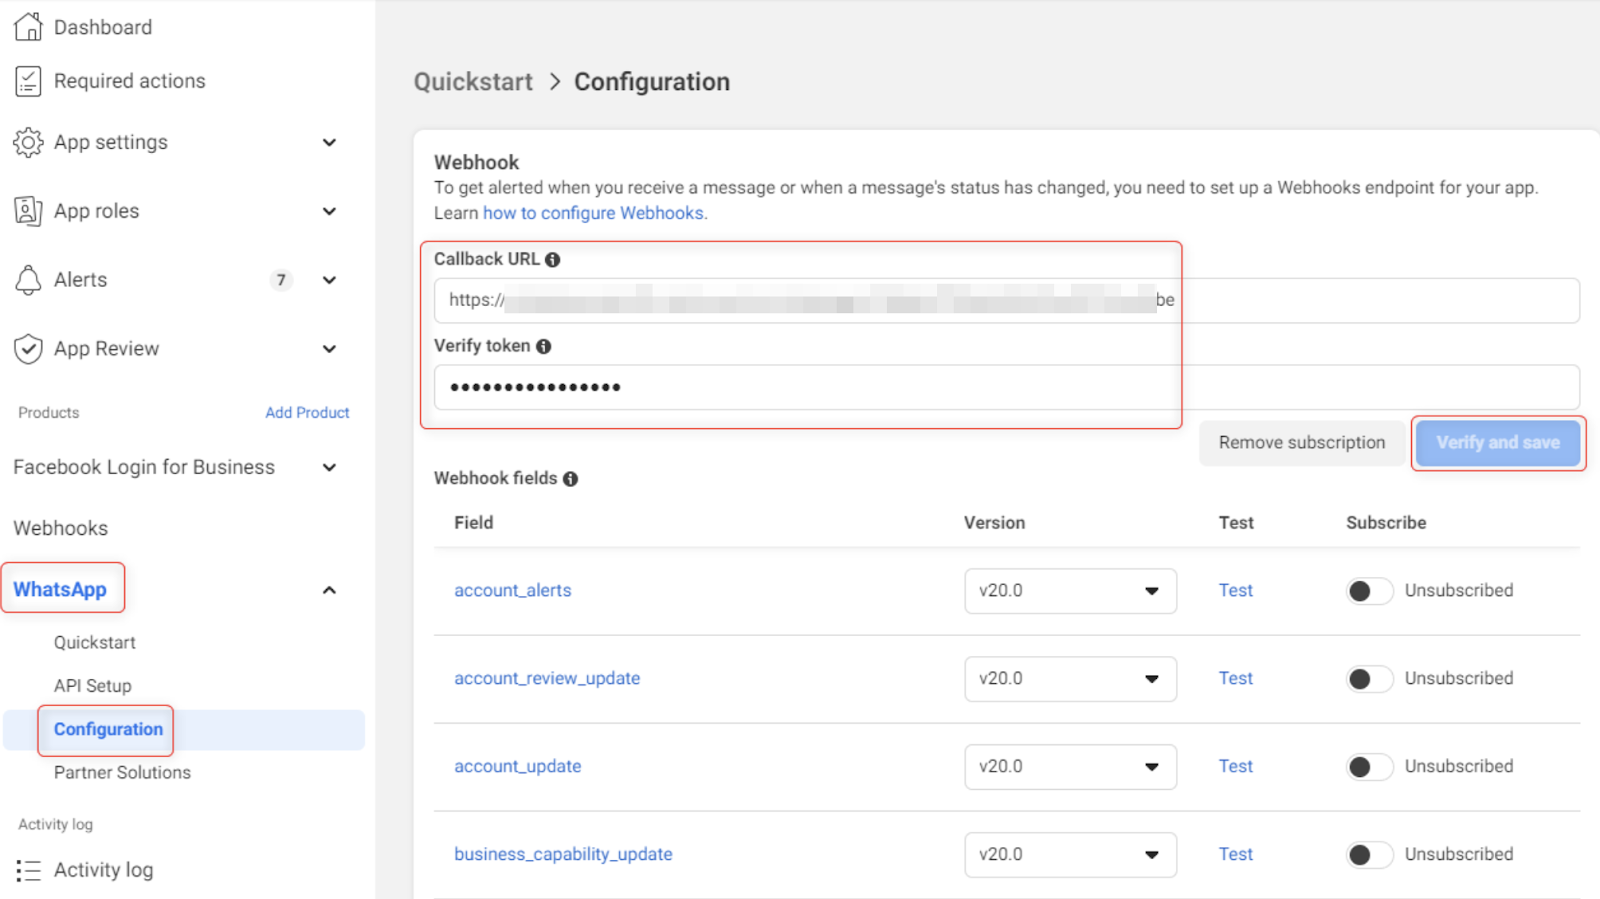
- Navigate to “WhatsApp” > “Configuration” and paste the 3CX WhatsApp webhook copied in step1.
- To verify the token, enter a random string of letters and numbers. This will not be needed again so there is no need to save your string for a later date. Click “Verify and save”.

- In the "Webhook fields" shown above, switch the toggle to "Subscribed". A notification popup will be displayed showing that the subscription was successful.
- You can now proceed to test your configuration by sending a WhatsApp message to your WhatsApp business number.
Related Articles
Configuring a SIP Trunk
Introduction To make and receive calls, you have to create an account with a SIP trunk provider (also referred to as a VoIP provider). A SIP trunk provider will connect you to the old-style PSTN. Having your own SIP trunk provider account means you ...Configuring IP Phones
Introduction 3CX enables easy deskphone configuration with Supported IP Phones being tested and auto-configured. Once provisioned, you can manage the phones from the 3CX Admin Console. To provision a phone, it needs to be told to connect to 3CX via a ...Configuring Jabra Headsets
Introduction The users of the 3CX Phone System can use Jabra headsets in order to answer/end calls, adjust volume levels, and mute/unmute calls. (Volume and mute control features depend on the capabilities of the headset you are using). Follow the ...Configuring Google Cloud Storage for 3CX
Take advantage of the reliable and cost-efficient online storage on Google Cloud Platform. 3CX enables you to create storage buckets under your Google Cloud account and use these to store backups and/or archive recordings. Prerequisites To configure ...Configuring a Draytek 2820 Firewall with 3CX
Introduction This document describes the configuration of a Draytek 2820 for use with 3CX Phone System. We will look into the NAT configuration necessary for 3CX Phone System and the QoS configuration to prioritize SIP and RTP traffic. This guide is ...