Voicemail and Recording Transcription
Introduction
- This feature requires PRO or Enterprise 3CX license.
- It requires a GCloud Account with Google Cloud Speech-to-Text API enabled.
- Recording file compression in “Reporting” > “Recordings” > “Quota” > “Compression” needs to be disabled.
- The first 1 minute of is transcribed only.
Step 1: Get a Google Cloud Subscription Key

Enable the Google Speech API from your GCloud Console. To do this:
- Login to your GCloud Console.
- Click on the burger menu on the top left of the screen and navigate to “APIs & Services” > “Dashboard”.
- Click “Enable APIs & Services”.
- Search for “Cloud Speech-to-Text API”, select and click “Enable”.
- Go to “APIs & Services” > “Dashboard” and click on “Credentials”.
- Select “Create Credentials” > “API Key”.

- On the dialog with the generated API key, copy the API key and then click on “Restrict Key”.
- Give a suitable “Name” to the API key, e.g. “My PBX Speech-to-Text API key”.

- In “Application restrictions” > “IP addresses” you can allow only your 3CX Phone System to access the API key by adding its IP address. Note: In case you are Hosted by 3CX or have a 3CX System installed in Dual Stack IPv4/IPv6 both of the IP addresses need to be allowed.
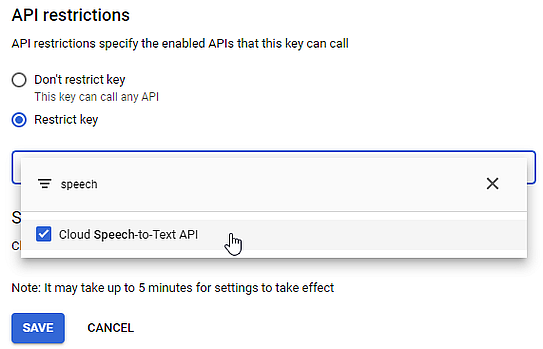
- In the “API restrictions” section, select the “Restrict key” option and then the “Cloud Speech-to-Text API” to restrict access only to this API.
- Click “Save” to apply your configuration.
Step 2: Enable Voicemail Transcription in 3CX
To configure 3CX to use transcription for voicemails and/or recordings:

- Go to “Settings” > “System” > “Voicemail” in 3CX Management Console.
- Enable the “Voicemail Transcription” option and paste the copied Cloud Speech-to-Text API key into the “Google Speech API Key” field.
- Use the “Speech Language” dropdown to set the transcription language.
- Select what to transcribe:
- “Voicemails Only” - restrict to voicemails.
- “Recordings Only” - apply only to the first minute of audio recordings.
- “Both Voicemails and Recordings”.
- Click “OK” to apply the settings. After enabling Voicemail Transcription, the transcripted text is included in the email body for received voicemails. Additionally, in the 3CX Web Client’s Voicemail function, the transcripted text is displayed next to each voicemail.
Related Articles
Record Voicemail Greetings
Voicemail Greetings In the “Web Client or Dekstop App > Settings” section, you can Record or Upload your Voicemail Greetings as well as Download or listen to your VM greetings. Record your Voicemail Greetings Go to your WebClient/Dekstop App Settings ...3CX Webclient: Voicemail
Set your voicemail via Web Client / Windows Desktop App Go to “Avatar > Your Name > Greetings”. Record a new greeting or upload a prerecorded message You can have different greetings per status To learn more about 3CX contact us at 1300 100 666 or ...Importing Extensions in Bulk - CSV File Structure
You can import extensions in bulk by creating a CSV (Comma Separated Values) file specifying all the options to be imported: Download the 3CX Phone System CSV sample file. The position of the column must remain as is. The comma delimited file ...Hardware Requirements
Introduction Refer to these suggested 3CX Phone System usage scenarios based on the extensions used, to assist you to size the minimum required hardware to run 3CX. A user (extension) is typically defined to use the 3CX Web Client/Desktop App and a ...Set Office Hours
Configure Office hours You probably don't want calls to ring your mobile in the middle of the night. Thank God for the office hours function then. Here you can configure when your business is open and when you are on break and then route your calls ...